If you have a secure socket layer certificate (SSL) on your website, you can automatically redirect visitors to the secured (HTTPS) version of your site for a secure connection. StormerHost.com hosting uses cPanel and there is a simple tool in cPanel that will help you accomplish this.
Enforcing SSL for Main domain and Addon domain:
- Open a new tab and type whynopadlock.com.

Screenshot 2
- Enter your domain name in the field provided and Click on the (I’m not a robot) to complete the recaptcha then Select Test Page.

Screenshot 26
- Click on the More Info at the far end of Force HTTPS.

Screenshot 28
- Copy Code provided in the rectangular grey box.

Screenshot 29
- Log into your cPanel. In the file section, Click on File Manager

Screenshot 30
- Select the public_html folder

Screenshot 31
- Search for .htaccess file. If not found, Click on Settings on the upper right corner.

Screenshot 32
- Select Show Hidden File and click on Save.

Screenshot 33
- Note: If you don’t find the .htaccess file after enabling the “show hidden files”, you can create a new one by Clicking Add File icon in the top left corner. Enter the name of the File i.e: .htaccess in the first file and Click on Create New File.

Screenshot 40
- Right Click on the .htaccess file then Select Edit.

Screenshot 35
- Click Edit again when the pop-up appears.

Screenshot 36
- Paste the Code you copied from the whynopadlock.com and Click on Save Changes.

Screenshot 37
- Go back to whynopadlock.com and retest the url.
Scroll down to the bottom and Click on the (I’m not a robot) to complete the recaptcha the Select Test Page
Screenshot 38
- HTTPS have been verified.

Screenshot 39
- Enforcing SSL for Addon domains:
Enter your domain name in the field provided and Click on the (I’m not a robot) to complete the recaptcha then Select Test Page.
Screenshot 26
- From the Test, SSL have not been activated unlike the Main domain.

Screenshot 44
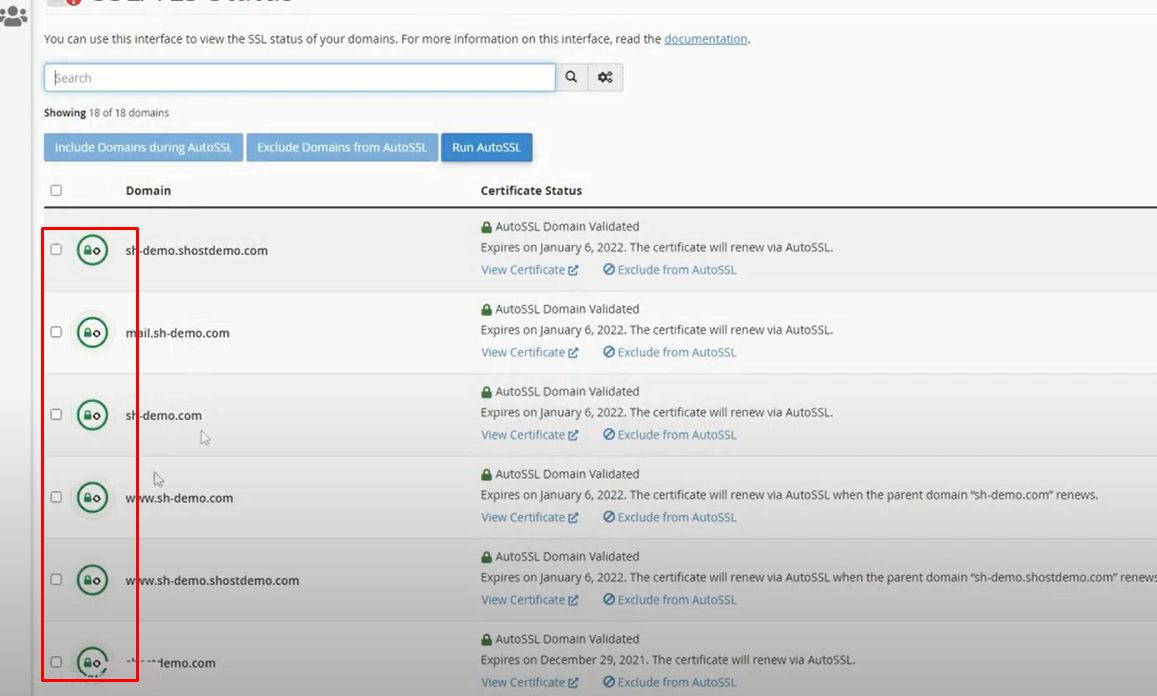
- First activate SSL Status. Login to your cpanel in the search bar, type SSL/TLS Status.

Screenshot 45
- Click on Run AutoSSL.

Screenshot 46
- Green Padlock Icon will confirm if it’s successful.

Screenshot 47
- Go back to whynopadlock.com.
Scroll down to the bottom and Click on the (I’m not a robot) to complete the recaptcha the Select Test Page.
Screenshot 48
- Click on the More Info at the far end of Force HTTPS

Screenshot 28
- Copy Code provided in the rectangular grey box.

Screenshot 29
- Log into your cPanel. In the file section, Click on File Manager

Screenshot 30
- Select the public_html folder

Screenshot 31
- Search for Addon domain directory i.e.(sh-demo.com)

Screenshot 49
- Right Click on the .htaccess file then Select Edit.

Screenshot 35
- Click Edit again when the pop-up appears.

Screenshot 36
- Paste the Code you copied from the whynopadlock.com and Click on Save Changes.

Screenshot 37
- Go back to whynopadlock.com and retest the url.
Scroll down to the bottom and Click on the (I’m not a robot) to complete the recaptcha the Select Test Page
Screenshot 38
- HTTPS have been verified.

Screenshot 39
Your domain should now be using HTTPS.
————————–
If you have an existing .htaccess file:
- Do not duplicate RewriteEngine On.
- Make sure the lines beginning RewriteCond and RewriteRule immediately follow the already existing RewriteEngine On.
